

A coating of substance covered the topside of the ship. One would find on further investigation that it was dust.
Yes, dust, from lack of use as my model space ship had been barely used it in the year or so I've had it.
But grasping the new Imperial Raider in my excited hands, I had newfound reason to organise a big space battle of Fantasy Flight's dogfight game, X-Wing.
I found two volunteer commanders, each who would take control of either Imperials or Rebel Alliance.
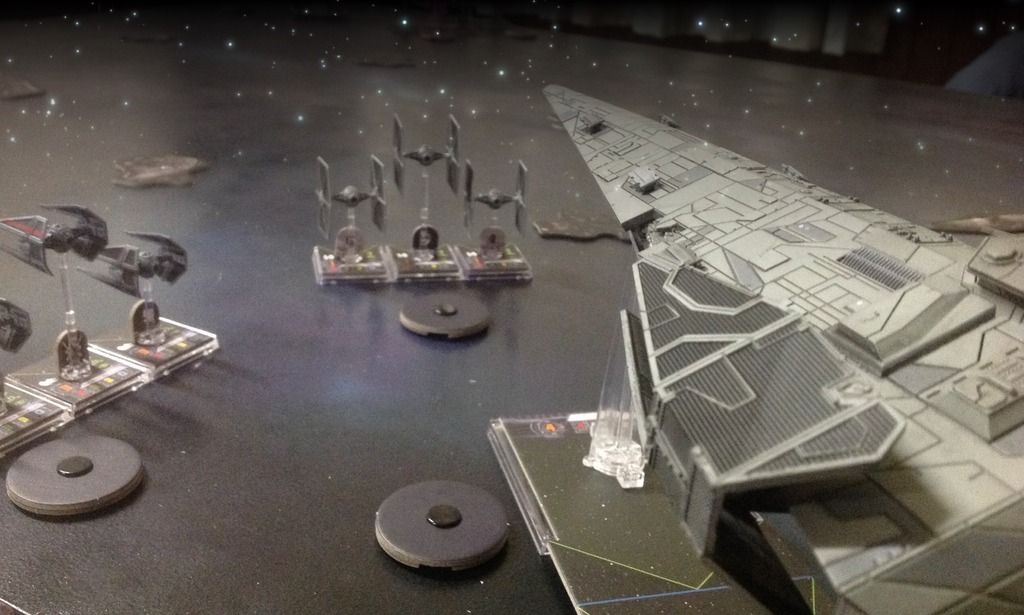
Dead1 took command of the Rebels aboard the CR90, Dodonna's Pride. Luke Skywalker was also aboard, along with his Astromech buddy, R2-D2. The ship would be supported by two squads with three wings each, Red Squadron X-Wing and Bandit Squadron Z-95 Headhunters.
Meanwhile, the Imperials would be commanded by Alpha Theta. The sleek Raider Instigator was carrying precious members, including the Sith Lord Darth Vader and tactical genius Grand Moff Tarkin.
The ship was also supported by two elements, a three piece squad of TIE Fighters piloted by Academy Pilots, and the more experienced Avenger Squadron TIE Interceptors.

The Mission
Both players had no experience fielding huge ships. So I decided to run a pitched battle with each side being deployed opposing corners. The huge ships' escort elements deployed as squads within Range 2 of the ships.
The mission would be won by destroying the other player's huge ship, regardless whether there were any escort ships surviving or not.
Special Rules
I included the following custom rules for this game.
Squad Manoeuvre: To speed up the game and concentrate on the huge shops, each squad of three fighters would only have a single manoeuvre dial. Upon revealing the dial, the player moves the middle fighter (squad leader), and the other two flanking fighters simply get dragged along. I understand that in a normal game of X-Wing that this is not always technically possible, but in larger games like this, it sped up the game and also made it more enjoyable for less experienced players.
To point is to have fun, right?
It did cause some irregularities during the game, such as doing a K-Turn but with one ship already being stressed (in which instances I gave it another stress and it rolled a red damage die).
Sometimes one of the ships would overlap and break formation. In this instance it skipped its actions as normal. On the next manoeuvre it snapped back into position.
Having an impartial Games Master (GM) made all this possible and easy for the players.
Random Initiative: As both huge ships had Pilot Skill 4 (as did the Red Squadron X-Wings), instead of one side having initiative always, this was randomly decided at the start of each turn! This added some uncertainty for both sides.
Space Debris: Another amendment was that the space debris would only affect the smaller ships as normal whilst huge ships simply ignored it (the were no asteroid like obstacles in this instance).
Screening: To push the idea of small ships screening the Corvettes, small ships could not fire on huge ships if they could legally shoot an enemy small ship instead.

Both Corvettes advanced towards one another at the slowest possible speed, trying power up their systems (the slower the ship moves, the more energy it gets.Energy is a resource spent to power secondary ships, special effects and replenish shields).
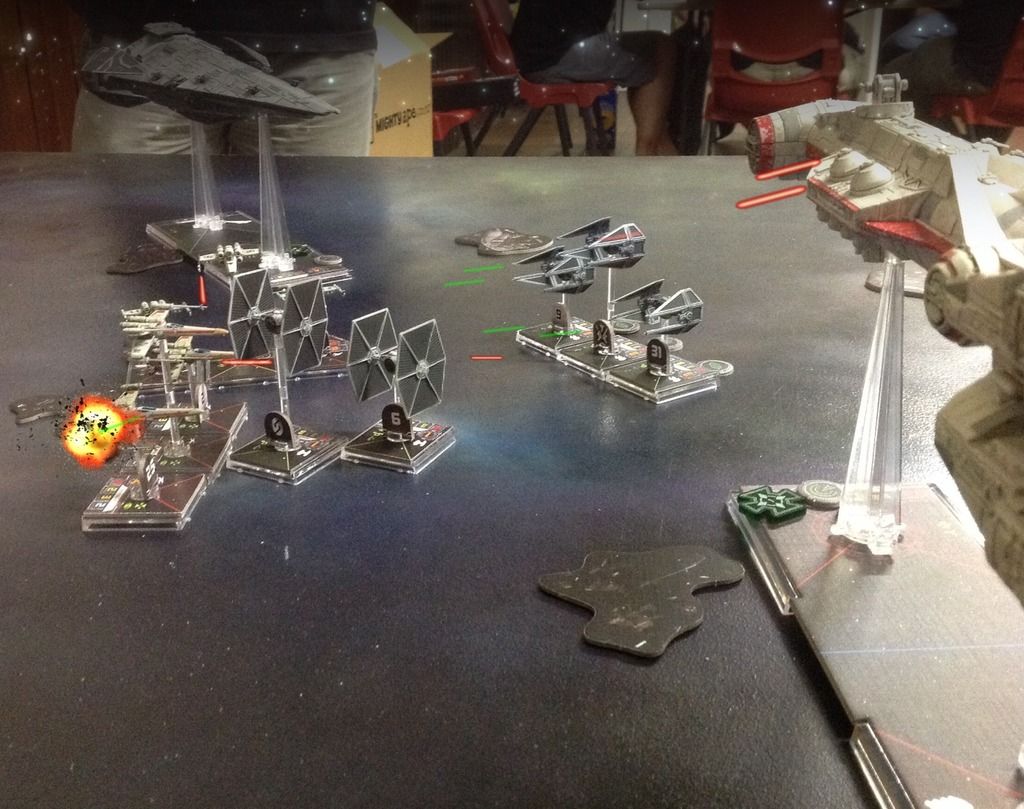
The Imperial escorts split, the TIE Fighters rushed ahead while the Interceptors started a long sweeping flank. The Rebel escorts on the other hand stuck together, driving towards the TIE fighters.
The huge ships continued at a Jargor Snail's pace, gaining all the energy needed but unable to support their now distant escorts.
The first few rounds of combat were against the Imperial's favour, as both the X-Wings and Headhunters were lined up against the unsupported TIE Fighters. Even Dodonna's Pride could add some of its firepower, though the secondary weapons' arcs of fire limited its impact.
One of the TIE Fighters exploded against the sheer power and the remaining two were also damaged. The reduced return fire from the Academy Pilots only managed to peel away some of the Headhunter's shields.

At this point the players started to get into grips with the pondering movement of the huge ships and also some of their strengths and weaknesses.
The CR90's primary weapon has unparalleled range of 3-5, and for an additional point of energy can throw an impressive 5 Firepower dice. Against TIE's and their Agility 3, at Ranges 4 to 5 the bonus defence dice make it very hard to hit, even with Luke Skywalker's ability to make another attack.
Meanwhile the Raider's primary weapon is Range is 2-4, but for an extra two energy, can fire twice.
The huge ships' firing arc were also very different from small ships and indeed one another. The CR90 preferred broadsides whilst the Raider's optimal arc was parallel to its forward diamond edges.
Into The Thick Of It
Whereas the first few turns were slow and uneventful, the following turns saw plenty of carnage.
As the Raider finally reached combat, the TIE Fighters were on their last stand. Before being destroyed by the combined Rebel fire, their point blank shooting saw one of the Red Squadron's X-Wings blow up.
The Interceptors and the Instigator also added their weight and reduced Bandit Squadron to a single Headhunter. The commanders at this point seemed very concerned about every loss of their small ship, and I reminded them that the object was to destroy the opposing Huge Ship.
Dodonna's Pride was the first to shoot at its adversary and the result were severe, thanks to lock ins and Luke Skywalker. The entire lot of the Fore section's shields were broken through and the Ion Battery scored a critical hit. The damage would see the Raider gain one less Energy for tne rest of the battle.
It was here that the guns of the Huge Ships proved to be devastating, as such ships gain limited defence in terms of defense dice. Return fire from the Instigator was terrible and unlucky, as instead of locking in the Imperial's spent their action and Energy reserves into replenishing all of its shields. Suddenly the commanders didn't seemed so concerned about the smaller ships!
Both Huge Ships altered their course. Dodonna's Pride banked to the side to reveal its broadside, the fire raking at the Instigator. The primary weapon and turbo lasers would strip the shields and the Ion Battery would cause a critical hit (each Ion token reduces the amount of Energy gained in the following turn). The Instigator's guns just failed to do any significant damage,however it initiated its Ionisation Reactor, causing damage to the nearby X-Wings.
Meanwhile Red Squadron and x were duking it out between the two Corvettes, slowly whittling each other down. Comm Boosters aboard the CR90 and Moff Tarkin on the Raider assisted their own escorts with special abilities (Comms remove all stress tokens and add a focus. Tarkin can add or remove a focus token from any nearby ship). However one of the Inyerceptors was obliterated when it was hit by the CR90's bulk!
The lone Headhunter shifted away from battle and was also nearly run over by the Raider, had it been a bit more aggresive (when a Huge Ship moves and overlaps any small or large ships, these ships are removed from the game regardless of their current health. The Huge a ship might suffer a single damage in return).

The Return of the Jedi
The Instigator just couldn't catch up, trying to allocate its limited Energy intake between replenishing shields, powering up its guns and trying to remove effects of various critical damage. As the CR90 still had most of its shields, Darth Vader's ability to cause critical damage (at the cost if two Damage to the Imperial ship) was pointless.
The small ships battled against one another, using the Huge Ships as cover, though one of the Interceptors was shot down.
In its aggresive approach the Rebel CR90 smashed into one of its escort ships, leaving Red Squadron to a single ship.
With Skywalker heading up the guns, further broadsides from Dodonna's Pride crippled the Fore section. We presume that Darth Vader, who was aboard the Fore Section, escaped unseen in his Advanced Tie or else was wounded or floating through space frozen. Still, the Aft Section had two guns operational but limited energy.
The Imperials steered their broken ship in an attempt to ram the CR90 but the turning abilities of these things are limited. Dodonna's Pride continued pouring fire into the Aft of the Raider and in a matter of turns the Instigator was nothing more but a scorched hulk.


Revenge Of The Sith... Maybe Next Time!
The poor Raider, for its first foray into battle I was hoping a little more performance. Sloth like manoeuvres and bad dice saw it doomed. It's an aggresive beast and likes to get into mid range fast whilst the CR90 likes ranged combat.
Dead1 managed his energy well and the first barrage into the Raider saw the Rebel Corvette jump to a significant advantage.
The smaller ships did little except smash each other, while some better tactics on both sides could have seen them try to navigate around enemy escorts and fire at the Huge Ships.
All in all, it was a good and cinematic battle to watch, even if this AAR does sound one sided. My special rules worked well (except for a few slight discrepancies or limitations) and helped speed the game up nicely and I'll use them again in similiar battles.
Both players have agreed to a rematch in the near future but will swap sides.
This was well done and very well described. I thank you for the effort put in to it and the many fine photos. I own a Cr-90 and my friend owns a Raider. We will try to play this battle out this week but I think we will use less escorts to keep it simple.
ReplyDelete